

Streamlining Deployment with Jenkins: A Comprehensive Guide for Beginners.

Hello, lovely people! This is Utkarsh, and I am passionate about DevOps. I have embarked on a journey to share my experience with all of you through my beginner-friendly blog.
Introduction :
In today's fast-paced software development landscape, efficient and automated deployment processes are essential for successful project delivery. In this blog post, we will explore the power of Jenkins, a widely-used automation server, to streamline the deployment of container images from GitHub to EC2 instances. Whether you are a beginner in the world of DevOps or looking to enhance your CI/CD skills, this comprehensive guide will walk you through each step of setting up a Jenkins pipeline for automated container deployment.
Setting up the Environment:
Create a GitHub repository for your project.
Clone the repository to your local machine using the command:
git clone <repository-url>.Add your application code and Dockerfile to the repository.
Commit and push the changes using the following commands:
git add.
git commit -m "Initial commit"
git push origin main
Set up an EC2 instance on AWS and install Docker on it.
Ensure that the EC2 instance is accessible over SSH.
Harnessing the Power of Jenkins:
Install Jenkins on a server or your local machine.
Access the Jenkins web interface and install the necessary plugins:
Pipeline Plugin: Allows creating Jenkins pipelines.
Git Plugin: Provides Git integration in Jenkins.
Configure Jenkins credentials:
For GitHub: Create a "Username with password" credential with your GitHub username and personal access token.
For EC2: Create an SSH username and private key credential for accessing the EC2 instance.
3. Constructing the Jenkins Pipeline:
Create a new Jenkins pipeline job.
Define the pipeline in the Jenkinsfile using declarative syntax.
Configure the pipeline to pull source code from the GitHub repository:

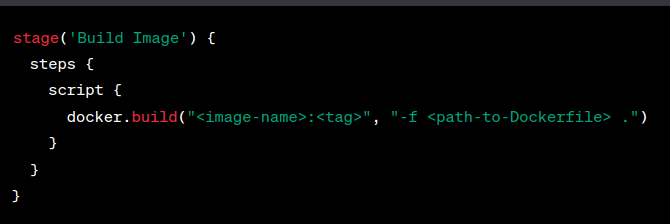
Use Docker to build the container image based on the Dockerfile:
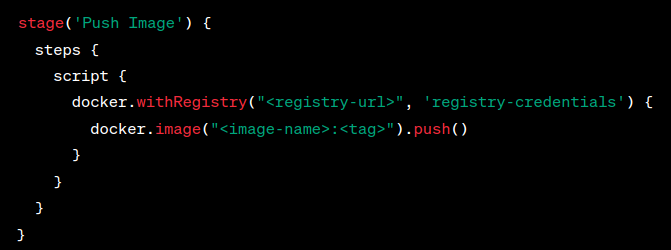
Push the container image to a container registry like Docker Hub or Amazon ECR:
Integrating GitHub and Jenkins:
In the Jenkins pipeline job configuration, enable the "GitHub hook trigger for GITScm polling" option.
Add a webhook in your GitHub repository settings pointing to your Jenkins server.
Configuring the Deployment Stage:
- Add a new stage to the Jenkins pipeline for deployment to the EC2 instance:

6. Testing and Verification:
Access the deployed application by entering the EC2 instance's public IP or domain in a web browser.
Verify that the application is running.
Conclusion:
Automating container deployments with Jenkins not only saves time and effort but also ensures consistency and reliability in software delivery. In this blog post, we've covered the complete process of setting up a Jenkins pipeline for deploying container images from GitHub to EC2 instances. By following the steps outlined, you'll gain hands-on experience with essential DevOps tools such as Jenkins, Docker, and AWS, empowering you to enhance your CI/CD capabilities and streamline your deployment workflows.
So, why wait? Let's embrace the power of Jenkins and unlock a world of seamless, automated deployments!!
Resources :
To learn the basics to advance follow these resources :


